


I've posted how-tos about double knitting before - in the intro tutorial, I covered the basics (which I do recommend you read before continuing on with this post), but the essential thing to know about how double knitting works is that it literally is double knitting:
- It's double-sided.
- You are working with two different yarns.
- You cast on double the stitches for the width that you need (e.g. if you want your knitting to be 10 stitches wide, you need to cast on 20 stitches.
- A single square of a double knitting chart requires you to perform a series of actions on two stitches. This means that your stitches come in pairs: typically one knit stitch (with both yarns at the back of the work), followed immediately by one purl stitch (with both yarns at the front of the work).
Usually in double knitting, your pairs of stitches are worked first in one colour, then in the other colour. For example, if you knit the first stitch of a pair with colour A, the next stitch needs to be purled with colour B; and if you knit the first stitch of pair with colour B, the next stitch needs to be purled with colour A.
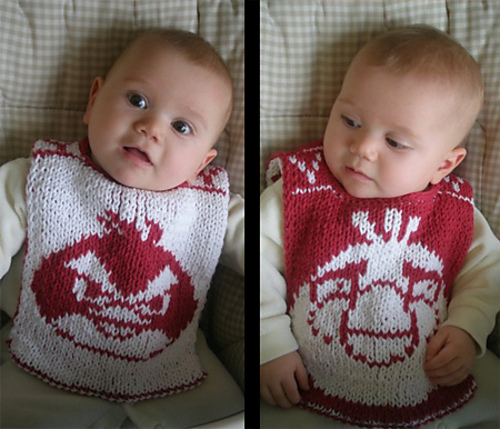
This gives you a reversible pattern, with the colours switched as you flip from side to side. For example, here's one of my double-knitted patterns with both sides shown in a single photo:
 |
| Zombaby bib pattern |
You can see that on one side there's a tan zombie on a green background, and on the other side there's a green zombie on a tan background.
So this is all very well and good, except that there is a catch: by the very nature of this technique, the imagery you work into your double knitting using this method will be flipped along the vertical axis when you look at the other side. For instance, you'll notice in that zombie bib example above, on the tan-zombie side, the eye on the right is the big one, but on the green-zombie side, the big eye is on the left.
What this means for your double knitting projects is that this method only works nicely for motifs which are either horizontally symmetrical, such as hearts...
 |
| Double the Love bib pattern |
This method unfortunately does not work nicely if, for example, you want to incorporate words into your double knitting, because most letters do not look the same when looked at in a mirror, because most words are not the same when they're spelled backwards, and because phrases/sentences are rarely the same when the words are put in reverse order! (Something like 'WOW MOM WOW' would of course be a rare exception.)
So what to do?
Fortunately, there is another method you can use if you want the two sides of your double knitting to look exactly the same as each other instead of the mirror image of each other.
Step 1: Take your double knitting chart
Here's an example of a double knitting chart, where each square represents two stitches to work.

The legend for this chart is as follows:
- White squares
- RS: knit 1 with colour A with both yarns at back, then purl 1 with colour B with both yarns at front
- WS: knit 1 with colour B with both yarns at back, then purl 1 with colour A with both yarns at front
- Black squares:
- RS: knit 1 with colour B with both yarns at back, then purl 1 with colour A with both yarns at front
- WS: knit 1 with colour A with both yarns at back, then purl 1 with colour B with both yarns at front
Following this chart will get you a colour B "L" on a colour A background on one side, and a backwards colour A "L" on a colour B background on the other side. This is presumably not what you want, so we need to start messing around with this chart a little bit.
Step 2: Convert your double knitting chart into a regular knitting chart
Here are the exact same instructions as conveyed by the chart in Step 1, but converted into a regular knitting chart, where each square represents one stitch to work (so of course the chart will be twice as wide as before).

The legend for this chart is as follows:
- Plain white squares:
- RS: knit 1 with colour A with both yarns at back
- WS: purl 1 with colour A with both yarns at front
- Plain black squares:
- RS: knit 1 with colour B with both yarns at back
- WS: purl 1 with colour B with both yarns at front
- White squares with black dots:
- RS: purl 1 with colour A with both yarns at front
- WS: knit 1 with colour A with both yarns at back
- Black squares with white dots:
- RS: purl 1 with colour B with both yarns at front
- WS: knit 1 with colour B with both yarns at back
So if you follow this chart, you will perform exactly the same knitting actions as if you were following the chart from Step 1. This of course still gives us a backwards "L" on one side of our work, but at least we're now closer to being able to fix that problem.
Step 3: Reverse the order of the even-numbered columns
This is where the real work gets done. We're going to take the chart from Step 2, and we're going to reverse the order of the even-numbered columns (while keeping all the odd-numbered columns exactly as they are). This will ensure that the "L" will not be backwards on one side. So:
- Column #2 moves to position #16
- Column #4 moves to position #14
- Column #6 moves to position #12
- Column #8 moves to position #10
- Column #10 moves to position #8
- Column #12 moves to position #6
- Column #14 moves to position #4
- Column #16 moves to position #2
And here is what the chart will look like once all this moving around is done:

And, just as with the chart from Step 2, the legend is as follows:
- Plain white squares:
- RS: knit 1 with colour A with both yarns at back
- WS: purl 1 with colour A with both yarns at front
- Plain black squares:
- RS: knit 1 with colour B with both yarns at back
- WS: purl 1 with colour B with both yarns at front
- White squares with black dots:
- RS: purl 1 with colour A with both yarns at front
- WS: knit 1 with colour A with both yarns at back
- Black squares with white dots:
- RS: purl 1 with colour B with both yarns at front
- WS: knit 1 with colour B with both yarns at back
Important note: As a result of this change, in some cases, some of your knit/purl pairs are going to be worked with the same colour as each other, rather than the opposite colour (as you're used to with standard double knitting). However, because we've departed from standard double knitting, this is to be expected and is perfectly fine. Regardless, though, you still need to have both yarns at back for knits and both at front for purls.
Incidentally, you can use a variant of this method if you're interested in coming up with a double knitting pattern where each side shows a totally different image. Here's how:
Step 1) Chart out each image separately
Let's say you want the first side to have a colour B circle on a colour A background, and the second side to have a colour A rectangle on a colour B background. Come up with two different charts, like so:
 |
| Chart for first side |
 |
| Chart for second side |
The chart for the first side is perfect as it is, and ready to use. But the chart for the second side still needs some tweaking: you need to add purl symbols to all of its squares. When done, it will look like this:
 |
| Converted chart for second side |
Step 3) Combine the two charts
This is the tricky bit. You're going to need to combine the two charts column by column, alternating from chart to chart each time you add a new column into the mix. As well, each chart gets added in a different order. When you add in columns from the first chart (the one with all the knits, i.e. colour B circle on colour A background), you need to start adding from the right side of the chart and move leftwards; and when you add in columns from the second chart (the one with all the purls, i.e. colour A rectangle on colour B background), you need to start adding from the left side of the chart and move rightwards.
Specifically in this example, the combining is done as follows:
- Column #1 of the final chart: Use column #1 from the knit chart
- Column #2 of the final chart: Use column #12 from the purl chart
- Column #3 of the final chart: Use column #2 from the knit chart
- Column #4 of the final chart: Use column #11 from the purl chart
- Column #5 of the final chart: Use column #3 from the knit chart
- Column #6 of the final chart: Use column #10 from the purl chart
- Column #7 of the final chart: Use column #4 from the knit chart
- Column #8 of the final chart: Use column #9 from the purl chart
- Column #9 of the final chart: Use column #5 from the knit chart
- Column #10 of the final chart: Use column #8 from the purl chart
- Column #11 of the final chart: Use column #6 from the knit chart
- Column #12 of the final chart: Use column #7 from the purl chart
- Column #13 of the final chart: Use column #7 from the knit chart
- Column #14 of the final chart: Use column #6 from the purl chart
- Column #15 of the final chart: Use column #8 from the knit chart
- Column #16 of the final chart: Use column #5 from the purl chart
- Column #17 of the final chart: Use column #9 from the knit chart
- Column #18 of the final chart: Use column #4 from the purl chart
- Column #19 of the final chart: Use column #10 from the knit chart
- Column #20 of the final chart: Use column #3 from the purl chart
- Column #21 of the final chart: Use column #11 from the knit chart
- Column #22 of the final chart: Use column #2 from the purl chart
- Column #23 of the final chart: Use column #12 from the knit chart
- Column #24 of the final chart: Use column #1 from the purl chart
And you will end up with this:
 |
| Final chart for double knitting with different images on each side |
Again, as this is a regular knitting chart, the legend is as follows:
- Plain white squares:
- RS: knit 1 with colour A with both yarns at back
- WS: purl 1 with colour A with both yarns at front
- Plain black squares:
- RS: knit 1 with colour B with both yarns at back
- WS: purl 1 with colour B with both yarns at front
- White squares with black dots:
- RS: purl 1 with colour A with both yarns at front
- WS: knit 1 with colour A with both yarns at back
- Black squares with white dots:
- RS: purl 1 with colour B with both yarns at front
- WS: knit 1 with colour B with both yarns at back
If you'd like to see another example of a chart which produces double knitting with different imagery on each side, I have a free pattern called Down with Pigs, which you can download to check out the chart:
Hope this helps, and happy double knitting!
15 comments:
Holy cow. You are a genius. Thank you for your explanation of this tricky technique!
You're very welcome! :)
Thank you so much for this explanation! Not only is it exactly what I was looking for, it's made 'regular' double knitting much clearer to me as well (though I have double knitted before...).
I'm having issues with some of the back stitches showing through to the front, leaving bars of the CC on the MC side. What am I doing wrong?
Sounds like you're not moving the yarns back and forth as needed, and some are getting caught on a side they're not supposed to be when not in use?
(Sorry about the delay with this reply - I only just now discovered your comment in my spam folder. :/ )
Nice work. I finally understood this method. But could you recommend a free PC program to create vs merge the differents samples i.e. insert the mirrored columns of the back (wrong) side between the columns on the front (right) side.
WOW! This is amazing! I was just about to start a custom pattern for some Christmas gifts--all double knit--and now I can take it to a whole other level! Thank you so much for this tutorial. :D You are awesome (and very talented)!
Many thanks for the great explanation! I have been exploring the internet for a decent explanation of this difficult method, but very glad I found you and your blog! Really easy with the added collums for each stich (instead of each combo of 2 stitches).
Do you read the chart in zigzag? Row 1 right to left, row 2 left to right and so on?
Great! Exactly what I was looking for.I can't wait to try it!
Hi there, your Down with Pigs pattern, in the lower section, has over quite a few rows, 1 colour worked for the front and back. Just curious as to why this doesn't become 1x1 rib. Great pattern btw, just wanted to clarify before I start. Thankyou
It does indeed have big stretches where the same colour is worked for front and back. And it actually *does* become 1x1 rib. Because all double knitting is essentially 1x1 rib. :) I cover why this is in this tutorial, if that helps: https://wipinsanity.blogspot.com/2009/10/about-double-knitting.html
What chart maker do you use to create the charts! I’ve struck out while trying on several. Thanks for the help!
Thank you for your work, because a few years ago I learned this knitting method with your guidance. But for a better overview, I used duckbills ( < , > ) to indicate the stiches and purls. That is, stich : > and purl : > according to the light and dark colors. This made the knitting plan much more visual for me. And I also made the columns that arrange the two patterns with two-color numbering, one in ascending order and the other in descending order. (The colors show where the stitch belongs.)
In addition, it is worth marking the colors of the stitches that make up the pattern with a thicker line so that we can distinguish them from the background or base color while knitting.
I hope I was able to help.
Post a Comment